In all Linux hosting packages DomainRegister makes available ImunifyAV+, a powerful malware scanner which helps to protect your website.
ImunifyAV+ thorougly sweeps files and accurately identifies malicious code, notifying of any issue on website, and then remove malicious software and computer virus strains.
To access it: click ImunifyAV icon in the main cPanel menu. There are following tabs in ImunifyAV end user interface:
- Files
- History
- Ignore List
Files
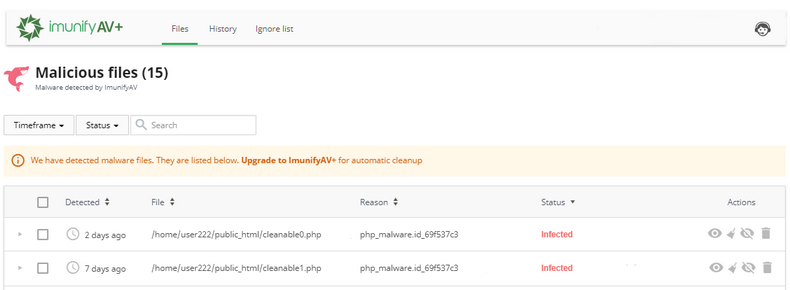
Go to ImunifyAV → Files tab.
Here, there is a table with a list of infected files.

The table has the following columns:
- Detected — displays the exact time when a file was detected as malicious
- File — the path where the file is located starting with root
- Reason — describes the signature which was detected during the scanning process. Names in this column depend on the signature vendor
- Status — displays the file status:
- Infected — threat was detected after scanning. If a file was not cleaned after cleanup, the info icon is displayed. Hover mouse over info icon to display the reason
- Cleaned — infected file is cleaned up
- Content removed — a file content was removed after cleanup
- Cleanup queued AV+ — infected file is queued for cleanup. Actions:
- Add to Ignore List — add file to Ignore List and remove it from the Malicious files list. Note that if a file is added to Ignore List, ImunifyAV will no longer scan this file
- View file — click eye icon in the file line and the file content will be displayed in the popup. Only the first 100Kb of the file content will be shown in case if a file has bigger size
- Cleanup AV+ — click to cleanup the file.
- Delete AV+ — remove the file from the server and from the list of Malicious files.
- Restore original AV+ — click Restore original to restore original file after cleaning up if backup is available.
To perform a bulk action, tick required users and click the corresponding button above the table.
The following filters are available:
- Timeframe — displays the results filtered by chosen period or date.
- Status — displays the results filtered by chosen status.
- Items per page displayed — click the number at the table bottom.
The table can be sorted by detection date (Detected), file path (File), Reason, and Status.
History
History tab contains data of all actions for all files.
Go to ImunifyAV → History tab. Here, there is a table with a list of files.
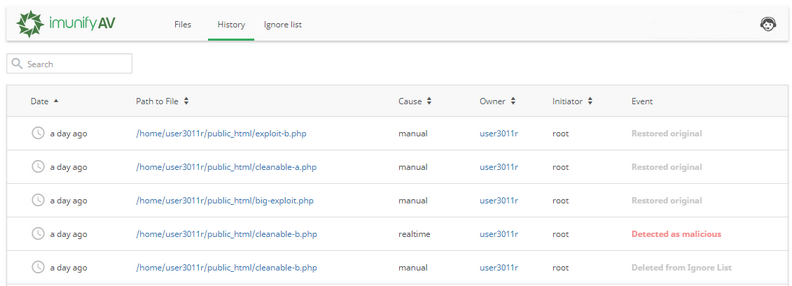
The table has the following columns:
- Date — action timestamp.
- Path to File — path to the file starting from the root.
- Cause — displays the way malicious file was found:
- Manual — scanning or cleaning was manually processed by a user.
- On-demand — scanning or cleaning was initiated/made by a user;
- Real time — scanning or cleaning was automatically processed by the system.
- Owner — displays a user name of file owner.
- Initiator — displays the name of a user who was initiated the action. For system actions the name is System.
- Event — displays the action with the file:
- Detected as malicious — after scanning the file was detected as infected;
- Cleaned — the file is cleaned up.
- Failed to clean up — there was a problem during cleanup. Hover mouse over the info icon to read more.
- Added to Ignore List — the file was added to Ignore List. ImunifyAV will not scan it but the file is not quarantined.
- Restored original — file content was restored as not malicious.
- Cleanup removed content — file contend was removed after cleanup.
- Deleted from Ignore List — the file was removed from Ignore List. ImunifyAV will scan it.
- Deleted — the file was deleted.
- Submitted for analysis — the file was submitted to Imunify360 team for analysis.
- Failed to delete — there was a problem during removal. Hover mouse over the info icon to read more.
- Failed to ignore — there was a problem during adding to Ignore List. Hover mouse over the info icon to read more.
- Failed to delete from ignore — there was a problem during removal from Ignore List. Hover mouse over the info icon to read more.
The table can be sorted by Date, Path to File, Cause, and Owner.
Ignore List
Ignore List tab contains the list of files that are excluded from Malware Scanner scanning.
Go to ImunifyAV → Ignore List tab. Here, there is a table with a list of files.
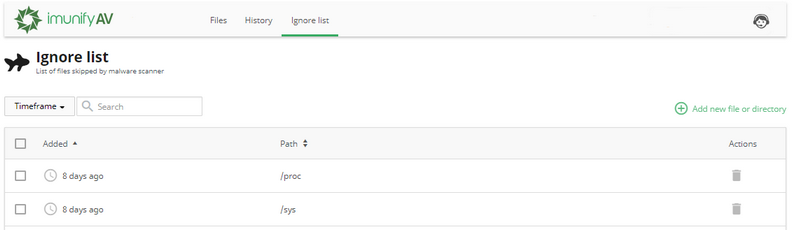
The table has the following columns:
- Added — the date when the file was added to Ignore List.
- Path — path to the file starting from the root.
- Actions:
- Remove from Ignore List — click Bin icon to remove the file from the Ignore List and start scanning.
- Add new file or directory — click Plus icon to add a new file or directory to Ignore List. To perform a bulk action, tick required files and click the corresponding button above the table.
The following filters are available:
- Timeframe — displays the results filtered by chosen period or date.
- Items per page displayed — click the number at the table bottom.
The table can be sorted by Added and Path. By default, it is sorted from newest to oldest.